If you follow me on Facebook or Twitter, you probably know I’ve been working on a huge custom set of dolls lately. It’s a set of twelve amigurumi (eleven doctors and a Tardis!) that a lucky Doctor Who fan is getting for Christmas. Do you watch the cult favorite sci-fi show Doctor Who? It has kind of a HUGE following here in the states and across the pond. Who knew? Ha.
I started with the First Doctor, then made the Second. I was waiting for some yarn I ordered to come in to make the Third, so I skipped to the current incarnation (Eleven). That yarn still hadn’t come in so I backtracked to the ever-popular and much-beloved Fourth Doctor, and just finished the Fifth a couple of days ago.
In case you missed them:
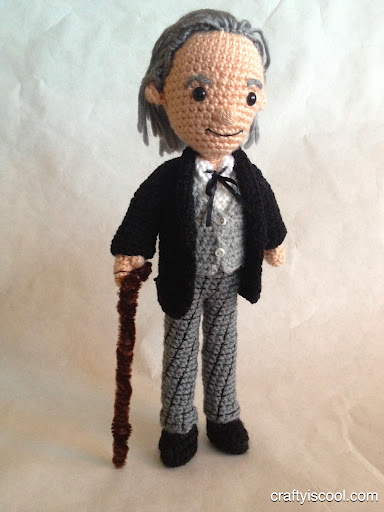
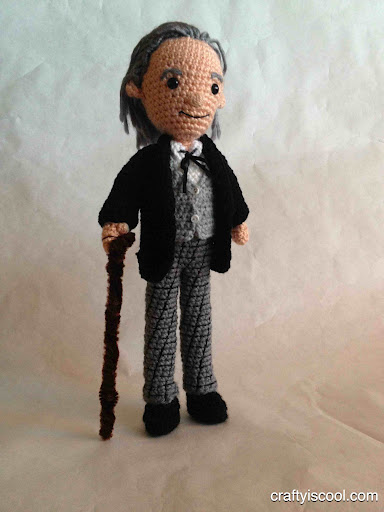
The First Doctor — William Hartnell “Doctor Who”
The First Doctor and the First Doctor amigurumi
The Second Doctor — Patrick Troughton “Doctor Who”
The Second Doctor and the Second Doctor amigurumi
The Fourth Doctor — Tom Baker “Doctor Who”
The Fourth Doctor and the Fourth Doctor amigurumi
The Fifth Doctor — Peter Davison “Doctor Who”
The Fifth Doctor and the Fifth Doctor amigurumi
The Eleventh Doctor — Matt Smith “Doctor Who”
The Eleventh Doctor and the Eleventh Doctor amigurumi
What do you think? Are you a Whovian too? Which Doctor is your favorite?
Patterns will be made available in the near future! Remember to follow me on Facebook and Twitter for updates about new pattern releases! Must…finish…doctors….
This year, all three of my kids, for the first time, are in school. The littlest started kindergarten and we’re all still trying to get used to it. I miss my little friends at home! The upside, of course, is that I have more time to do things at home. Working moms and stay at home moms alike, I’m sure, welcome that “Back to School” season when they can start getting just a little more time to work on a few projects.
Some projects you could actually do while your kids are at school and finish by the time you drive to pick them up or before they hop off the bus! I kid you not. How about greeting your kids with an afterschool snack AND an afterschool plushie?
Using my Baby Monster pattern, I was able to whip up three monsters in just a couple of hours. I used the exact same pattern and look at the results I got!
Worsted, Bulky, Double Bulky!
My Baby Monster pattern was written to make little pocket-sized monsters, but I wanted to experiment with using chunky yarn and bigger hooks.
Let’s take a look at what I decided to use.
From the top: Bernat Sheep(ish) by Vickie Howell and a D hook, Bernat Softee Chunky and an N hook, double strands of Bernat Softee Chunky and a Q hook
I used my original pattern, reprinted below, adding feet to a couple of them, but keeping the rest of the pattern the same. I used felt for the biggest monster’s eyes.
Baby Monster by CraftyisCool
Head/Body:
Starting at the top of the monster’s head, with desired yarn and an corresponding hook (see above), make an adjustable ring, chain (ch) 1, and single crochet (sc) 6 stitches into the ring. Pull the ring closed with the loose yarn tail. R1 (Row or Round 1): 2sc into each st (12) R2: (2sc into next st, sc into next st)* rep around (18) R3: (sc into next st, 2sc into next st, sc into next st)* rep around (24) R4-12: sc into each st (24) Fasten off OR continue on to make feet. Optional Feet: R13: (Hdc, 2 dc) into next st, (2 dc, hdc) into next st, sl st into next 5, (hdc, 2 dc) into next st, (2 dc, hdc) into next st, sl st into next st Fasten off. Set aside.
Base: Make an adjustable ring, chain (ch) 1, and single crochet (sc) 6 stitches into the ring. Pull the ring closed. R1: 2 sc into each st (12) R2: (2 sc into next st, sc into next st)* rep to end of rnd (18) R3: (sc into next st, 2sc into next st, sc into next st)* rep to end of rnd (24) Fasten off, leaving a long tail. Finishing: Insert safety eyes if desired, following package directions. For a child-friendly toy, use a safe fabric glue and arrange felt shapes to create the features. Stitch a smile with black yarn and a yarn needle. Line up the stitches from the base with the stitches of the bottom row of the body and begin sewing them together, stitch to stitch. Stuff the body fully before closing up the last few stitches and tucking the end inside. Using a regular D hook and worsted weight yarn gives you a cute little monster that would be adorable as a keychain (just add a loop of elastic and keyring to the top).
Worsted weight Bernat Sheep(ish) by Vickie Howell and a D hook
Upsizing to a larger hook and chunky yarn makes a bigger monster that’s just as cute but more huggable.
Bulky weight Bernat Softee Chunky and an N hook
Using the largest hook I had, a Q, and double stranding the chunky yarn, I got an awesomely chubby and squeezable stuffed monster! Hold two strands together while you crochet, following the same pattern, and use a really big hook. What a difference!
Double stranded Bernat Softee Chunky and a Q hook
Although it takes a little getting used to, crocheting with a large hook and thick yarn can even be used in amigurumi! Who knew? As always, it is best to keep your stitches as tight as possible, even with the huge hook and yarn, because big holes in your fabric will mean stuffing showing and coming through.
With all of the available colors of Bernat’s Softee Chunky (which has recently gotten even more chunky, by the way) I foresee a rainbow of big chunky Baby Monsters decorating children’s playrooms, teachers’ classrooms, and Halloween mantles everywhere! Of course if you still love the little ones, Vickie Howell’s Sheep(ish) and its trendy color range is where you will definitely find some inspiration.
I love taking custom orders. Let me rephrase that. I LOVE TAKING CUSTOM ORDERS. Making something from one of my patterns is fun, and of course its easier, but making something based on someone’s photo or someone’s big idea is really rewarding. Several months ago I got a request to make a full set of Doctor Who amigurumi, including all eleven doctors and a Tardis. They are to be a Christmas present and I have been getting to work on them lately. I never knew what a huge following Doctor Who has! My best source of information has been from cosplay instructions. That is, very specific costuming instructions for Doctor Who doctors, down to the most minute details. I love this series of articles on BBC America, starting with How To Dress Like The First Doctor | Anglophenia | BBC America. Each Doctor has specific characteristics, which of course lend themselves perfectly to the type of amigurumi I like to do!
I made one so far and the next is in progress…
Gentlemen. First Doctor “Doctor Who” amigurumi
Doctor Who?! First Doctor “Doctor Who” amigurumi
I’m thinking I’ll go chronologically, so the Second Doctor will be next. If you just can’t wait to see the 10th and 11th Doctors (I know you!) it won’t be too long. Remember, these are due by Christmas!
If you’re thinking about putting in an order for Christmas or the Holidays, please get that in as soon as possible. I won’t be able to take all the requests I get so let me know as soon as you can. Thanks!
Make sure you’re keeping up with this and other projects over on my Facebook page, where I post lots of pictures and sneak peeks. Thanks for following!
In the interest of saving time, checking things off my to-do list, and branching out into “simpler” territory, I decided to design a new series of dolls, the CraftyisCool Minis! Don’t get me wrong. I really prefer making larger dolls like I’ve always done because of all the little details I can fit in. It’s not that they are even all that large, but they do have more parts and take a little more time than your average Amigurumi Monster.
It was about a week before the new season of Breaking Bad premiered and I had really wanted to make a set of Walter White and Jesse Pinkman to celebrate it. I didn’t think I’d have time to make the dolls, write the pattern, proofread the pattern, and then publish it before the show premiered. I decided to shrink my normal design into a cute little version, about 4″ tall.
Breaking Bad Amigurumi Minis
Little Walt and Jesse each have a hat, hazmat jumpsuit and tiny bag of crystal. I wrote a pattern to combine the two dolls, and really, they don’t take too long to make. The doll is mostly one piece from head to foot, with added arms. Lots of little details added make them recognizable, I think.
Where’s my gas mask?!
In his underwear, yo!
The blue stuff!
I was lucky enough that BoingBoing did a piece on the dolls and word got around. I’d love to hear from Bryan Cranston and/or Aaron Paul and send them their own sets! (So hey, anyone reading that can make that happen, yeah that would be awesome… 😉 )
Not long after I made the Breaking Bad dolls, my husband and I went to see Wes Anderson’s Moonrise Kingdom. LOVED. I’ve always been a fan of Wes Anderson movies. A friend of mine and I used to ask potential dates if they liked the movie Rushmore. It was a gauge of how compatible we were with that person. If he said, “Love it!”, check! If he said “Never seen it!”, potential was still there. If he said, “I don’t get it!/Not funny!”, deal breaker! In hindsight I guess that was pretty shallow, but it was a pretty good test! My friend’s potential partner hadn’t ever seen it so we scheduled a “screening.” The whole time he just had this puzzled “huh?” look on his face. It didn’t work out between them.
During Moonrise Kingdom there is a scene where the two leads, Suzy and Sam, get married and walk in slow motion out of a little chapel. As they were walking I leaned over and told my husband (sorry for talking during the movie, Alamo!), “I have to make dolls of them!” The next day I made these little guys.
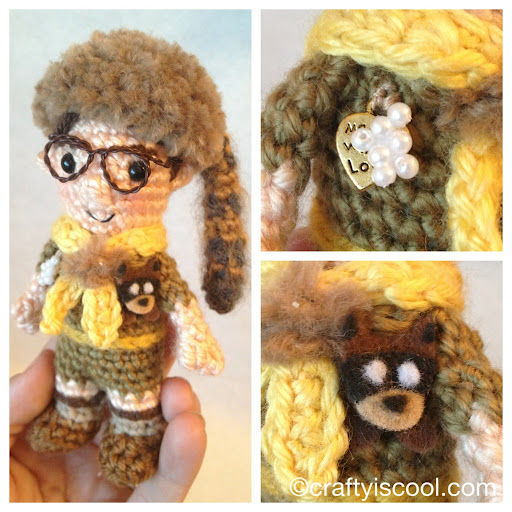
Moonrise Kingdom Amigurumi Minis
If you’ve seen the movie, you’ll recognize Suzy’s blue eyeshadow and portable record player and Sam’s coonskin cap and glasses. Suzy’s record player snaps open and the record is removable. Sam is wearing his late mother’s pearl and gold brooch and a felt raccoon Khaki Scout badge.
Sam and his badges
Suzy, record player and binoculars
What I love about these Minis is the quick turnaround time, the fewer pieces to assemble, and their overall cute factor. It enables me to do something trendy and of-the-moment without investing a huge chunk of time (a few days from start to finish, pattern and all, versus up to two weeks for larger dolls and patterns). I’m not sure who will be next in this Mini-series. Any suggestions? I’d love to hear them!
Since my last post I’ve been pretty productive, so I wanted to show you some things I’ve been working on! This is a photo-intense post, so get ready…
I made this doll of a birthday girl and her pet cat, including a little kitty hat her mom had made her! She had a little removable tie-front cardigan with tiny flowers on one lapel. Word is, she loved it!
I got an order for two pets for someone’s birthday. The first was a bulldog, who is ADORABLE, and the second I haven’t finished yet, a Boston Terrier. I got to deliver this one in person, a rare treat, and she loved him.
Next up, a doll I made for a well-known bartender that works at the hottest bar/live music venue here in Austin, the Mohawk. He’s got a famous beard and is into Jiu-Jitsu. I made one doll for the Mohawk, and two dolls in Jiu-Jitsu outfits for his twin daughters. I sewed his little Western shirt out of an old one I had. His t-shirt has a Mohawk logo iron-on. Nice beard, right??
Someone you might recognize, Questlove, or DJ Questo, of The Roots, also known as Jimmy Fallon’s house band. I loved making him. I made him a little hair pick out of glittery black Sculpey clay, drumsticks that I carved from a long wooden dowel, and little red hoodie. I was able to go to The Roots’ show at the Mohawk during SXSW and hand-deliver the doll to Questlove himself! He loved him and told me it was the most beautiful thing anyone had ever given him! I was thrilled.
Last up is a project I actually did almost a year ago, but just got this picture! My husband wrote to the people at Rancho Obi-wan, Steve Sansweet’s mecca of Star Wars collectibles. He has the largest Star Wars collection in the world and has worked for Lucasfilm and written several books about Star Wars. He was kind enough to pose with my Salacious Crumb, which I sold in the Stitch Wars Strikes Back show last summer. Awesome, right?
I’ll post some more finished projects soon. I’m working on a really large order this week and then continuing work on my book. This summer I should be more able to take custom orders, my FAVORITE thing to do! Thanks for reading!
Little amigurumi Matthew McConaughey is back with some interesting news.
He already talked with Austin Eavesdropper about the Top 10 Things to do in Austin. Now he has the scoop on a contest that is running here in Austin for SXSW. It’s pretty serious too, since the grand prize is $5,000 and all you have to do is stroll around downtown scanning QR codes to get the cash!
Citysearch recently appointed me a local Austin scout, which means I’ll be writing reviews and suggestions on my favorite (and not favorite) things here in Austin over on the Citysearch site, starting with SXSW, of course. I’ll be on hand, along with lots of the other Citysearch scouts (a real who’s who of Austin bloggers and who I feel lucky to hang out with!), to help run this pretty sweet scavenger hunt this weekend. Matthew will be with us, just helping out and serenading us with the heavenly intonations of his bongo.
Stores around the downtown Austin area will have cute little signs like this in the window.
When you see little Sid E. Serch, just scan the QR code on the sign and follow the instructions. There will even be instant win prizes when you scan these codes, like $300 on the spot! You don’t have to aimlessly wonder, looking for codes. There will be a list of hints so you can expertly navigate your way around and win that money!
Want some more details? Follow this link for all the details from Citysearch and Sid E. Serch.
Remember! The codes won’t go live until Friday, March 9th at 7:00 pm central. You’ll have until Sunday to find all the codes you can to get the most points.
I’ll leave you all with a candid shot I took while Matthew was practicing his yoga this morning. He’s so uninhibited, isn’t he?
This hilarious interview is brought to you by Citysearch and Austin Eavesdropper, with the help of my hook, yarn, and lots and LOTS of research on Matthew McConaughey via Google image search. Tough work. 😉 Enjoy!
I hope you all know Austin’s favorite shirtless resident, Matthew McConaughey and his notorious bongo skills. Turns out he has a lot of questions about fun things to do in Austin for SXSW too. Check out that cute little crocheted bootie!
Say, man. You got another bongo? It’d be a lot cooler if you did.
We have shelves and shelves of kids’ books. I’m kind of a hoarder in that regard. I love going to Goodwill or the Salvation Army store and picking up armloads for 50 cents each. If you looked through our books about 75% would have a thrift store price tag on them. I try to get my kids to pick a different book every night, but you can only read a Spongebob beginning reader book so many times before you want to put it through a shredder. Dora the Explorer books and books based on kids’ movies, the same. When you read a really good children’s book, however, you don’t mind when your kid asks for it for the 5th time that week. Take the Sneetches, for example. Does my five year old understand that its a story about non-conformity and prejudice? Probably not. But he does think that Sylvester McMonkey McBean is pretty kooky. He likes to see them all pay “ten dollars eaches” and have those stars disappear and come back again in his amazing machine. But I have a feeling that when he’s reading the story about bellies with stars and others with “none upon thars”, he’ll grow up with a little more of an open mind. Its what Dr. Suess would have wanted.
Before you get started, some inspiration. If you haven’t watched this before, I encourage you to take a minute now, because it is just plain awesome. The catchy 70s music will eat you up!
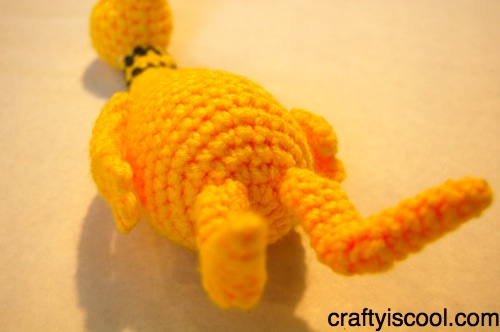
This crocheted amigurumi sneetch is easy to make and fun to play with. His belly star is attached with velcro so he can take it off and put it back on again. He’ll be invited to all the marshmallow toasts and frankfurter roasts that way.
Sneetch:
You will need:
Materials: Yellow worsted weight yarn Gray worsted weight yarn White fuzzy yarn (baby or “cloud” yarn) White felt Green felt 6mm black safety eyes Black embroidery floss Small piece of velcro, just the “hook” side, sew-on type
Tools: Size E crochet hook Yarn needle Embroidery needle
Body: Rnd 1: Starting at the bottom of the body with yellow yarn, make an adjustable ring, ch 1, and sc 6 into the ring. Pull tail tightly to close hole. (6) Rnd 2: Work 2 sc into each st (12) Rnd 3: (2 sc into next st, sc into next st)* repeat around (18) Rnd 4: (2 sc into next st, sc into next 2 st)* rep around (24) Rnd 5: (2 sc into next st, sc into next 3 st)* rep around (30) Rnd 6-9: Sc into each st (30) Rnd 10: (Sc2tog, sc into next 8 st)* rep around (27) Rnd 11: Sc into each st (27) Rnd 12: (Sc2tog, sc into next 7 st)* rep around (24) Rnd 13: Sc into each st (24) Rnd 14: (Sc2tog, sc into next 6 st)* rep around (21) Rnd 15: (Sc2tog, sc into next 5 st)* rep around (18) Rnd 16: (Sc2tog, sc into next 4 st)* rep around (15) Rnd 17: (Sc2tog, sc into next 3 st)* rep around (12) Rnd 18: (Sc2tog, sc into next 4 st)* rep around (10) Rnd 19-21: Sc into each st (10) * Insert stuffing into the larger bottom part of the body before you proceed with the neck (or you’ll be sorry)! Rnd 22: Sc2tog, sc into next 8 (9) Rnd 23: Sc into each st (9) *Change to gray yarn at last st of Rnd 23. Rnd 24: Sc into each st (9) *Change to yellow yarn at last st of Rnd 24. Rnd 25-26: Sc into each st (9) *Change to gray yarn at last st of Rnd 26. Rnd 27: Sc into each st (9) *Change to yellow yarn at last st of Rnd 27. You can cut the gray yarn. Work the next few stitches over the end to secure. Rnd 28: Sc into each st (9) Fasten off and cut tail short. Stuff the neck and set aside.
Head: Rnd 1: Starting at the nose end of the head with yellow yarn, make an adjustable ring, ch 1, and sc 4 into the ring. Pull tail tightly to close hole. (4) Rnd 2: Sc into each st (4) Rnd 3: (2 Sc into next st, sc into next st)* rep to end (6) Rnd 4: Sc into each st (6) Rnd 5: (2 Sc into next st, sc into next 2 st)* rep to end (8) Rnd 6: Sc into each st (8) Rnd 7: (2 Sc into next st, sc into next st)* rep to end (12) Rnd 8: (2 Sc into next st, sc into next 2 st)* rep to end (15) Rnd 9-10: Sc into next 5 st, hdc into next 5 st, sc into next 5 st (15) Rnd 11: Sc into next 5 st, hdc into next st, dc into next 3 st, hdc into next st, sc into next 5 st (15) Rnd 12: (Sc2tog, sc into next 3 st)* rep to end (12) *Cut tiny ovals from white felt. Cut a slit in each oval and insert the eye, then insert the eye into the face as shown, and attach washer on the inside. Stuff the head. Rnd 13: Sc2tog around (6) Fasten off and leave a long tail. Weave tail through last row of stitches to close hole, then down through bottom of head. Sew onto body and weave in ends.
Arm (Make 2):
Rnd 1: Starting at the shoulder with yellow yarn, make an adjustable ring, ch 1, and sc 5 into the ring. Pull tail tightly to close hole. (5)
Rnd 2-8: Sc into each st (5)
Rnd 9: 2 Sc into next st, sc into each st (6)
Rnd 10: Sc into each st (6)
Row 11: Ch 1, and fold the arm flat. Working through both layers of the arm, sc across the end 3. This closes the arm. It does not need to be stuffed. Turn and work the next row across the top. (3)
Row 12: (Ch 3, sc into 2nd ch from hook and next ch, then sl st into next st)* rep across for three fingers.
Fasten off with a sl st and sew arms to body.
Leg (Make 2)
Rnd 1: Starting at the toe end of the foot with yellow yarn, make an adjustable ring, ch 1, and sc 3 into the ring. Pull tail tightly to close hole. (3)
Rnd 2: 2 Sc into next st, sc into each st (4)
Rnd 3: 2 Sc into next st, sc into each st (5)
Rnd 4: Sc into each st (5)
Rnd 5: 2 Sc into next st, sc into each st (6)
Rnd 6: Sc into each st (6)
Rnd 7-8: Dc into next 3 st, sl st into next 3 st (6)
*This forms the heel.
Rnd 9-13: Sc into each st (6)
Rnd 14: Sc into next 4 st, sc2tog (5)
Fasten off and sew to bottom of body as shown. No stuffing is necessary.
Finishing:
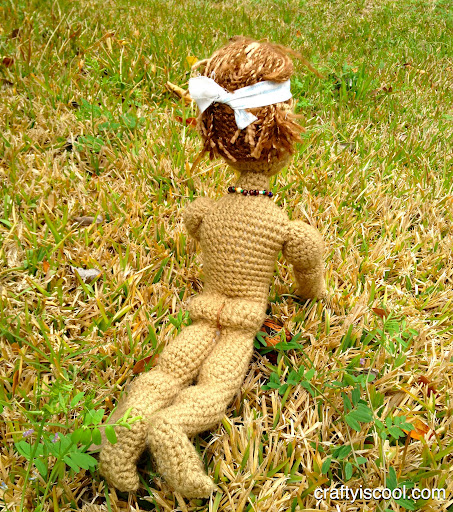
White mane:
Cut four inch long strands of white fuzzy yarn. Insert hook into a stitch around the neck just above where the arms are attached, and pull up a loop of the white yarn. Pull ends through loop to fasten to neck. Do this all the way around the neck twice. Try to keep strands close together. When you’re finished, trim the strands as shown.
Face:
Using black embroidery floss, embroider a straight vertical stitch for the smile on one cheek, then a line all the way across (using three even horizontal straight stitches), then another short vertical line on the other cheek. Do not cut floss. On last stitch, insert the needle back into the head, and come out at the very top of the head through the yarn (do not come up through a “hole” in the stitches or the floss will not be secured). Knot the embroidery floss close to the surface and cut it about 1/2″ long for the Sneetch’s hair.
Star:
Cut a star from two layers of green felt. On one of the pieces, sew a tiny patch of velcro with the rough hook side. Using the same green thread, sew the layers together with a whipstitch close to the edge. The rough velcro will stick to your Sneetch’s belly. You may need to periodically trim the fuzz that may come up from removing and applying the star.
Hope you have fun making your own little Sneetch. What a great baby shower or birthday gift it would be to give Dr. Suess’ amazing book with your own handmade little Sneetch! If you make one, I’d love to see a picture of him! Post him to the Ravelry page or on CraftyisCool on Facebook.
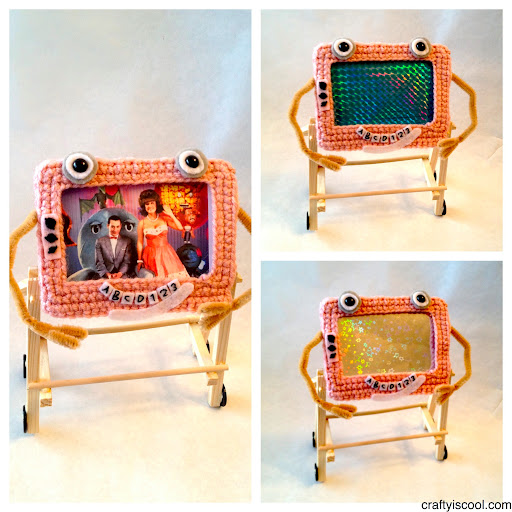
Last year when I made Pee-wee and Chairry, and eventually Jambi, I drew a sketch in my notebook of a Magic Screen amigurumi. It didn’t seem doable at the time. I didn’t know how I would do the legs and everything I thought of seemed really cheesy looking (and the entire screen could not be held up by pipe cleaners!) so I kind of abandoned the idea. (I love that story!) More digging around at the craft store revealed several non-conventional items that I could use to make Magic Screen, so the project was a go. I made her last night and I couldn’t be happier!
Magic Screen with interchangeable screen
More photos after the jump!
My original big idea was to have her act as sort of a picture frame, where I could change out what was on her “screen”. I wanted to be able to put pictures, patterned holographic paper, or little messages inside. It worked out brilliantly! Little Magic Screen could even play “connect the dots” if I could find a clear enough image for her! (And there is an awesome picture of Pee-wee and Magic Screen’s cousin Magic Johnson that I’m going to have to print out…)
When you try out the pattern (which is now in my Ravelry and Craftsy shops) you’ll probably like how there is not too much to crochet. It goes really fast! The rest of it is getting creative with craft supplies, so what’s not to love? This Magic Screen is on its way to Pee-wee himself! Au revoir Magic Screen!
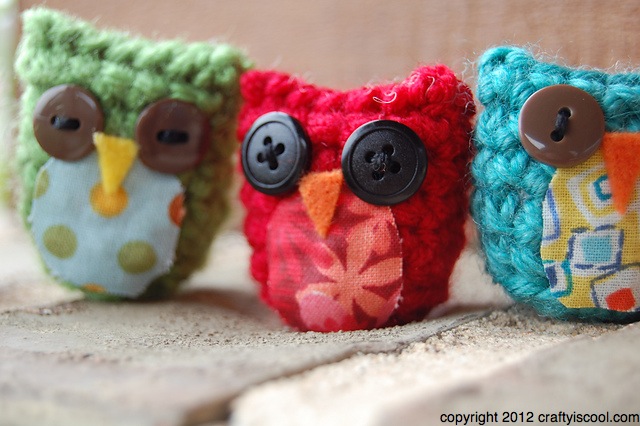
Last year I participated in the Renegade Craft Fair here in Austin. It was so much fun and I hope I have time to do it again next year. (This year is definitely OUT–ahem…book….!) I wanted to design something with an owl since everything Renegade is represented by an owl. I put together about 150 kits each containing materials and tools to make a tiny Austin Owl amigurumi. I designed the pattern to be accessible to beginners and seasoned crocheters. They are fun and customizable since they can be made in any color imaginable and with teeny tiny fabric scraps. When I’m not crocheting I also like to sew (mostly Halloween costumes and the like) so I’m no stranger to leftover bits of fabric that I hate to throw away. It’s fun to put colors together in unexpected ways to make these cute little guys. I’ve had this pattern in my Ravelry shop for a while now but I wanted to set the owls free! Get it?
Austin Owl Amigurumi
Here’s what you’ll need:
Materials: Worsted weight yarn (any color) Polyester fiberfill Fabric Felt Two small (~ 3/8″) buttons
Tools: Crochet hook (I used size E, 3.5mm) Yarn needle Craft glue OR matching thread
Body:
Rnd 1: Starting at bottom of body, with yarn and Hook, make an adjustable ring, ch 1, and sc 6 into the ring. Pull closed.
Rnd 2: Work 2 sc into each st (12)
Rnd 3: Working in back loops of each stitch only (BLO), sc into each st (12)
Rnds 4-7: Sc into each st (12)
Rnd 8: (2 Sc into next st, sc into next 5 st)* rep to end of round (14)
Fasten off and leave a long tail for sewing. Stuff the owl. Thread the yarn needle with the yarn tail. Flatten the top edge so that you have one long seam of 7 st to sew through. Whipstitch the seam closed, knot the yarn tail and hide within the body of the owl, clipping the tail close to the surface.
Finishing:
Cut a small egg shape from the fabric for the owl’s tummy. Glue or sew the patch onto the owl. Cut a small triangle from felt and glue to owl for the beak. Glue or sew two button eyes to the owl’s face.
Pick your colors!
Whooooo is making a whole nest full of these?
These would be cute little Valentine’s day gifts! Once you get going on them, they are quick and fun to make. If you’re not ready to commit to Valentine’s, how adorable would these be in your Easter basket? Hope you enjoy these little guys!