craftyiscool

Amigurumi Patterns and Playthings

>Branching Out

>

When you crochet amigurumi, the yarn you’re usually working with is either acrylic, wool, a blend, sometimes cotton (which I usually hate working with), and almost always a solid color.  So when you go in a yarn store, choices are pretty limited as far as choosing awesome yarns in unique colorways.  Ya gotta make something else sometimes, just so you can buy some super-fantastic yarn!

Enter the Noro Plaid Scarf by Jessica Suzanne.  She made the scarf with Noro sock yarn, but I bought this Noro Kureyon at The Knitting Nest here in Austin (where I also teach!) with a birthday gift card and I had to make something worthy of its beautiful changing color.  (enough links for you?)  I reduced the beginning chain to 23 or 24 (check back with me after I make another one because I can’t remember how many chains I started with! :)) and so there were eleven holes in the mesh of the base scarf.  It was fun to weave in all the chains at the end and see the color develop.  I think I’m going to set up a fall class for this scarf because it was really easy, pretty quick, and the end product would be a beautiful gift!

OK, enough about scarves, because I got a few custom orders that I’m super-duper excited about!  Hopefully, patterns will come soon after I finish them, in time for some Christmas crafting, so until then, here’s what’s coming:  Wonder Woman, Chuckles the Clown, and Jambi!
3 Comments »

>Walking Tall — Far from Yosemite

>Just something non-amigurumi-related, still crafty and crochet-ish, and this is so intense….

My mom had knee surgery yesterday.. Long story short, she lost 72 pounds over the course of a year from sheer will-power and determination; meaning, she stopped eating junk and she started walking and sometimes running, EVERY day. She’s a jock!!!  I’m very proud of her BUT she started having horrible knee pain and she needed surgery for torn cartilage, misaligned knee cap, bone spurs, etc. She can’t walk now, of course, and the dr. said she could try crutches but I thought for home she needed something a little easier to use, more stable, etc, so…….duhduhduh (music of doom)….I got her a walker.

I knew just bringing over a “walker” wouldn’t go over well. “Hey old lady, here’s your walker!!” She hates “old age” stuff anyway, so I thought I’d add a little “pizazz”…like this:

I measured the rubber gripper handles and double crocheted double rainbow handles. Get it? They are about 5″ by 5.5″, one row of double crochet of each color, then two rows of gray single crochet on each edge, then wrapped around the handles, stitched together, and voila! A hip walker that even my prideful mother can stomach for a week or two! 

Go ahead, crochet some covers for your walker, a cozy for your neti pot, a throw rug for your wheelchair ramp (ok maybe not), or a doily to put under your nebulizer.  Its functional but why can’t it be full-on double rainbow too??  🙂

What does this mean?

2 Comments »

>Because I am so CLASSY….

>Haha.  Get it, classy?  I’m going to be teaching CLASSES!  Yeah, yeah.  Har har. 

So I get my Moo cards, and I think, I need to give these things out!  They’re adorable!  They have my information on one side, and pictures of some of my creations on the other.  I love them.  Anyway, I get the little box and decide to head over the yarn store down the street (literally), The Knitting Nest.  They are having a class with Franklin Habit, a popular blogger, knitter, writer, comic-drawer (word?), and its Worldwide Knit in Public Day.  The owner was around and I asked her if she’d like my patterns to sell, she said she had seen my Conan and she’d love it.  Long story short, I dropped off a binder-full of patterns to display (just order them on etsy like everyone else! ;)) and a Pee-Wee, a DJ Lance Rock, Michael Jackson (I’ll get to that in a minute), and a Conan!  I also brought along a rainbow of baby monsters, 10 to be exact, that I’m going to show you, blog reader, how to make! (IF you take my Basic Amigurumi class July 8th from 10:30-12:30 OR July 17th 2-4 at The Knitting Nest, in Austin.)

I’m also going to teach a class on a more “advanced” project, which my little boy, 4 (that’s his age, not his name), dubbed “Lovey”.  They’re doing a Monster-making contest for July, hence the monstrous projects.

If these projects don’t look challenging enough and you want to go a step further, there’s the “Make Your Own Monster” (or whatever else you want to make) Workshop, July 25th from 2-5.  When I make all my amigurumi, I start with a sketch, draw all over that sketch with nonsensical (to others) numbers and drawings and chickenscratch, and come up with a pattern.  Then I start crocheting, making adustments as I go.  I’m going to teach you how to do this too, starting with a simple sketch.

The Knitting Nest has every flavor of Cascade 220 wool yarn imaginable.  It’s a little breathtaking when you walk in and see the spectrum of color on the wall.  I’m about ready to toss all the acrylic that is crowding my bins and trade it all in for nicer yarn, but I have to take baby steps.  It really feels different to work with better yarn.   

So if you’re in Austin, I’d love to have you in one of my classes!  If you’re not in Austin, it is a nice place to visit and I’ll see you there anyway!  I’m excited to start and hope you can learn a lot. 

What I was also going to show you was my “yet-to-have-a-written-pattern-for” Michael Jackson!  I wanted to make a Michael for a while and had so many different looks to choose from.  I had to go with this Beat It look, just for that jacket.  And yes, sticklers-for-accuracy, he didn’t actually wear that bedazzled glove in that video, but how could I make Michael and not crochet a tiny sparkly glove?  I shall write that pattern, even if it kills me, which the jacket may nearly do, because there’s so many little details.  But besides the jacket, how about that jeri curl yarn?  Amazing, huh?  Wait for the pattern, dear crocheters.  All in good time. 

So now you’re done reading this extra-long blog post and now you are going to call the Knitting Nest, drop by to see all my work, or email Stacy to sign up, right?

4 Comments »

>Break it Down!

>

This pattern has been on my list of things to do for a long time, and I think when I have a long list of things to do I get a little restless.  I’m really really really good at procrastinating, so much so that I picked the thing on the bottom of my list (DJ Lance Rock) and made him instead of you know, another load of laundry.  I have about a million Conan O’Brien dolls to complete, and don’t get me wrong, I’m way ahead of schedule on those but it gets a little tedious.  So this weekend I took a little break and made a super cool dancing DJ—DJ Lance Rock!  I think you’ll like making him too, and if you want to start out slow, here’s his boombox! 

BOOMBOX:

Front and back (make 2):
Using gray yarn and an E hook, ch 16.
R1: sc into second stitch from hook and next 14 st, ch 1, turn (15)
R2-9: sc into each st, ch 1, turn.
Do not ch 1, turn on the last row. Fasten off and leave a long tail.

Edge (make 1):
Using gray yarn and an E hook, ch 5.
R1: sc into second stitch from hook and next 3 st, ch1, turn (4)
R2-9: sc into each st, ch 1, turn (4)
R10: sc into BLO, ch 1, turn (4)
R11-25: sc into each st, ch 1, turn (4)
R26: sc into BLO, ch 1, turn (4)
R27-34: sc into each st, ch 1, turn (4)
R35: sc into FLO, ch 1, turn (4)
R36-49: sc into each st, ch 1, turn (4)
Do not ch 1, turn on the last row. Fasten off and leave a long tail.

Sew edge piece around the front of the boombox. Stitch the back onto the edging, leaving it open to stuff. Stuff with polyester fiber fill, a foam block cut to size, or a stack of polyester batting. Stitch completely closed and hide yarn tail within boombox.

Speakers (make 2):
Using dark pink yarn and an E hook, make an adjustable ring, ch 1, and sc 6 into ring. Pull closed.
R1: 2sc into each st (12)
Fasten off and sew speakers to front of boombox.

Finishing:
Cut a square of black felt to fit the front of the boombox a shown. Stitch a row each of pink, green, yellow, and blue as shown. Stitch across the middle with white yarn. Sew or glue the panel to the front of the boombox.

Create a handle for the boombox! Fold a pipecleaner in half and bend into the handle shape. The handle should be almost the length of the boombox. With a very long piece of yarn, wrap the handle all the way around with gray yarn. Stick the handle straight down into the top of the boombox. Sew the pipe cleaner into the boombox by wrapping the base tightly and knotting the yarn, then repeating.
 

DJ Lance is available in my etsy shop!  If you use this pattern and like it, let me know!  I’d love to see your finished boomboxes and DJs!  Make sure you link back to me if you share this pattern—-thanks 🙂

9 Comments »

>BOGO for COCO!

>Quick update!  Lucky me scored some tickets to Conan O’Brien’s show tonight in Austin!  Yippeeeeee!  So to celebrate that achievement (and it was an achievement, believe me!) I’m having a sale!

With any purchase from my etsy shop, you can pick any free pattern!  Of course the free pattern has to be the same price or cheaper.  If it doesn’t turn out that way I’ll just send you a Paypal invoice for the difference.  Mention “BOGO for COCO” in the message to seller section when you check out.  We’ll make it last til midnight TOMORROW (Saturday night) central time. 

Get it—-BOGO for COCO?  (….crickets…..)

Leave a comment »

>One FREE Acre of Land for Everyone! Happy Mother’s Day!

>

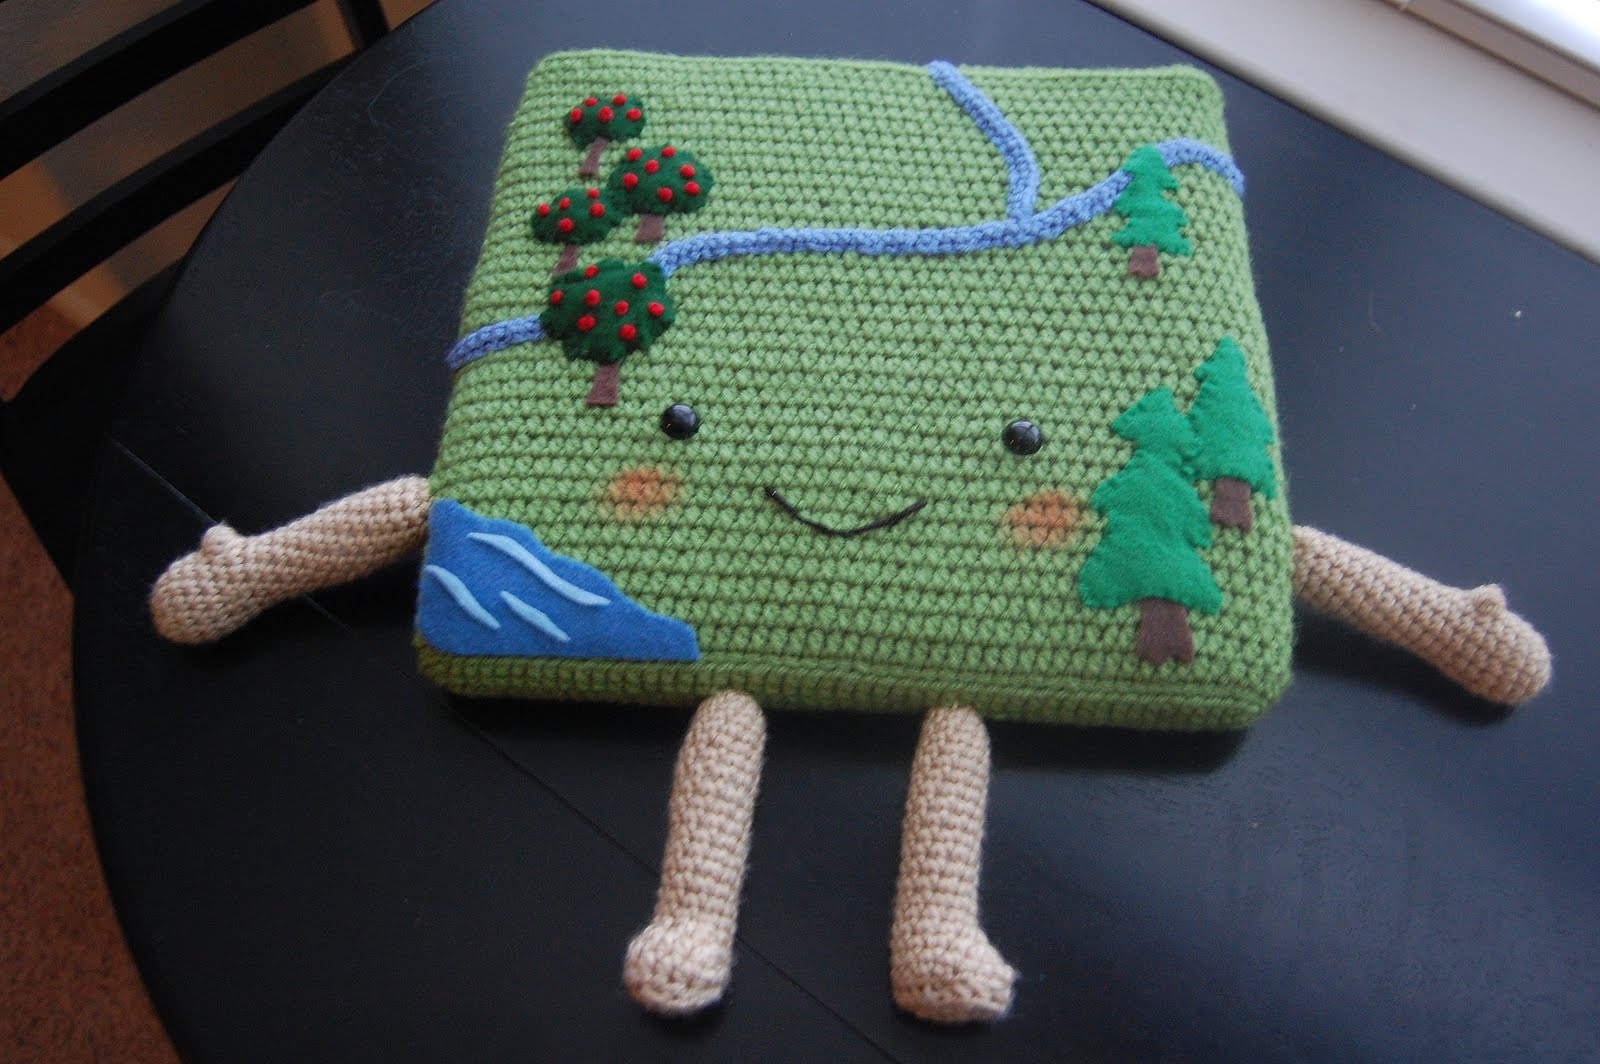
I think it’s really fun to make something based on someone else’s idea, which is how this creation came about.  The “client” (haha that sounds so professional; I love it) that ordered this guy wanted a stuffed “acre of land” complete with a river, trees, and whatever else, and the only stipulation was that he had a face, legs, and be super-cute.  I love etsy for being there when someone has a request like this.  Have you used their Alchemy feature?  It’s awesome.  Anything you want, ask for it, and it will probably be done.  And lots of people will be chomping at the bit to do it for you.  So here is her teaching tool, a stuffed acre, an environmental awareness friend.  I think he looks like a Farmville mascot or something.  My kids love him and unfortunately will not be keeping him!  Also, a free pattern!  Hooray!

STUFFED ACRE:
Materials Needed:
Worsted weight yarns:
  Light Green
  Tan
  Blue
Brown Felt
Lt Green Felt
Dk Green Felt
Black 15mm Safety Eyes
12x12x1 Foam Square
Quilt batting
Polyester Fiberfill
E Hook
Yarn Needle

BODY:
With an E Hook and light green yarn, ch 49.
R1: 2sc into 2nd ch from hook, sc into next 46, 4 sc into last ch, working around other side of ch, sc into next 46 and 2sc into last ch.
R2: sc into 1st ch, 2sc into next ch, sc across and 2sc into next to last ch, sc next ch, 2sc next ch, sc across and 2sc next to last ch, sc into last ch.
R3: sc into back loops only (BLO) all the way around.
R4-38: hdc around.
R39: sc into BLO around.
R40: sc2tog at each corner(4 times total), sc across edges.
R41: sc2tog at each end (2 times), sc across edges.
Fasten off and leave a very long tail.

Insert two 15mm safety eyes as shown. Trim a 12x12x1 foam square as necessary (I trimmed about an inch off one edge to fit). Wrap square in quilt batting to make it rounder and softer. Stuff crocheted block and stitch closed with long yarn tail.

ARMS (Make 2):

With an E Hook and tan yarn, make an adjustable ring, ch 1, and sc 6 into ring. Pull closed.
R1: 2sc into each st (12)
R2: (2sc into next st, sc into next 3 st)* rep to end of rnd (15)
R3-4: sc into each st (15)
R5: dec 1, sc around (14)
R6: dec 1, sc into next 6 st, bobble stitch into next st, sc next 6 st (13)
R7: dec 1, sc around (12)
R8: (sc into next 4 st, sc2tog)* rep to end of rnd (10)
R9-20: sc into each st (10)
Fasten off and stuff firmly. Sew to side of body.

LEGS (Make 2):

With an E Hook and tan yarn, make an adjustable ring, ch 1, and sc 6 into ring. Pull closed.
R1: (2sc into next st, sc into next st)* rep to end of rnd (9)
R2: 2sc into first st, sc into each st (10)
R3-17: sc into each st (15)
R18: 3hdc into next st, sc into next 9 st (17)
R19: 3hdc into next st, hdc into next st, 3 hdc into next st, sc into next 9 st (21)
R20: sc around (21)
Fasten off.  Set aside.

SOLE OF FOOT (Make 2):

With an E Hook and tan yarn, ch 5.
R1: sc (into back bumps of ch) 3 st across. 3 sc into last ch, sc into st on other side of chain around, 2sc into last ch.
R2: sc into next 4 st, 3sc into next st, sc into next st, 3sc into next st, sc around other side, 2sc into last st.
Fasten off and leave a long tail. Stuff legs firmly and sew sole of foot to bottom of leg. Sew legs to body.

Stitch a face for your land. Use blush to make rosy cheeks. Add a river made of a long row of chain stitches. Decorate with felt trees. Add apples to the trees by using red yarn to make french knots. Sew or glue down to your land. Have fun decorating him!

Feel free to post this pattern whereever but PLEASE link back to me, Allison Hoffman, Crafty is Cool!, and gimme some credit!  I love posting free patterns but seeing them for sale or not credited back is….lame….
Thanks!

11 Comments »

>I know you are, but what am I? Amigurumi!

>

You know how when you’re a kid you watch movies or TV shows and you think they’re so great and funny and cool, and then you remember them when you’re an adult and go back to watch them, and you can’t believe you were so into it when you were young and had a completely different sense of humor? Well, watching Pee-Wee’s Playhouse totally does not apply.
A few years ago we ordered the complete series on DVD and I swear, they never get old. I have three little boys that LOVE watching right along with me. What is it about that show? It was so fun, with smart writing and totally off-the-wall plotlines, Tim Burton-esque special effects, and the star of it all was pretty dynamic. Who didn’t want a Picture-phone or a mousehole full of tiny dinosaurs? Even when Randy showed up or a salesman came knocking, it was still the coolest place on Saturday morning. Who else LOVES Pee-Wee??

I made a lil Pee-Wee doll, and luckily I wrote down a pattern as I went because now you can make one yourself with a little bit of crochet know-how. That gray jacket he’s sporting unbuttons and comes off, but unfortunately that is NOT a boomerang bow-tie. It’s permanently affixed to Pee-Wee’s neck. His sweet white shoes will look great while he’s doing the “Tequila” dance, however, so get him to a biker bar ASAP!
(and please click on those links to see some great moments with Pee-Wee!)
Posted by Picasa
2 Comments »

>I’m With Coco Giveaway!

>

The super cool people (Lauren and Mike Mitchell) at I’m With Coco! on Facebook (and everywhere else!) have set up a great fan page for Conan O’Brien.  Duh.  You’ve heard of it and you are probably all fans, right?  Well I recently made a lil’ Coco for them and shipped him away, soon to be given away to one lucky Coco-nut on their facebook page.  They’ll have all the details, so if you aren’t already a fan, go ahead, become a fan already!  Watch for it coming up very soon.  Conan’s birthday is the 18th–think that might have something to do with it?  I do! Happy Birthday, great pale one!  And if you don’t have cable, get it.  TBS.  It will soon be on your favorites list.

If you want to make your own Conan, there’s always the pattern—available in my etsy shop!

1 Comment »

>I’m Team Coco, and you?

>

I think when someone tells you they like Coco over Leno you can tell something about that person.  I’ve done my research.  I mean have you read this article trashing Leno?  It may be a little harsh, or are we supposed to feel sorry for him?  I’ve never really laughed out loud watching his schtick, but OMG I’ve done just that watching many hundreds or thousands of things Conan’s done. 

Yes, we’re sad for Conan, but he said it best:
“…if you work really hard and you’re kind, amazing things will happen.”

So true.  He took the high road, left with dignity, and now he has legions, and I mean LEGIONS of fans just waiting to follow him anywhere he goes. 

So I was inspired to make a li’l Coco.  Kids might not care about him much, so I guess this is one for the grownups—which is OK!  Check out my etsy shop if you want to make your own.  Conan will be getting one soon.  And his little beard comes off for when he goes back on the air!

Oh and if you like discussing this great guy you should become a fan of “I’m With Coco” on Facebook!
And there’s a new Crafty is Cool facebook fan page!  Check it!

4 Comments »

>Peek into Wonderland

>

My name being Allison, when I was growing up I got called Allison Wonderland pretty often 🙂  I always thought the movie was kind of bizarre, but that Disney version seems mainstream now after seeing the Tim Burton preview!  Now that’s bizarre!  Bizarrely AWESOME!  I don’t know if Bizarrely is a word, but, I digress, I decided to make an Alice doll.  She’s not really the Disney version, not really the Tim Burton version so much either.  Of course she’s blonde, but really this pattern could be made into just a sweet doll, not necessarily a storybook character.  Her little white rabbit took a whole 15 minutes to make, and the pattern is just too easy and fun NOT to post here.  Make him for Alice and then in a couple months PLEASE make them in pastel colors and stick ’em in your kids Easter baskets.  That would be so cute!!

The White Rabbit!
Head and body:
Using white yarn and an E Hook, make an adjustable ring, ch 1, and sc 6 into ring.
R1: 2 sc each stitch (12)
R2: (2sc next st, sc next st)* rep around (18)
R3: (2sc next st, sc next 8 st)* rep around (20)
R4-10: sc each st (20)
R11: sc into first 10 st, skip next 10 st (10)
R12: starting at 1st st of R11, sc into each st (10)
R13: sc each st (10)
R14: sc2tog around (5)
Fasten off first leg.  Stuff bunny firmly.  Join yarn at 11th st of R10.  Repeat R11-14 for second leg.

Ears (make 2):
Using white yarn and an E Hook, make an adjustable ring, ch 1, and sc 6 into ring.

R1: (2sc next st, sc next st)* rep around (9)
R2-3: sc each st (9)
R4: dec 1 (8)
Fasten off, leaving a long tail.  Flatten ear and attach to top of rabbit’s head.

Arms (make 2):
Using white yarn and an E Hook, make an adjustable ring, ch 1, and sc 6 into ring.

R1: (2sc next st, sc next st)* rep around (9)
R2: sc each st (9)
R3: dec 1 (8)
R4: dec 1 (7)
Fasten off leaving a long tail.  Stuff arm and sew to side of body.

Finishing:
Using black embroidery thread, embroider eyes using a french knot.  Come back up at same spot and make a french knot over the original to make the eye a little larger.  Embroider nose and mouth as a big “x”.
Using pink embroidery thread, embroider nose using a satin stitch. 
Cut a small red heart from felt and either sew or glue to bunny’s chest.
Shade white rabbit’s ears with blush.  Done!

The White Rabbit’s buddy Alice is NOW available as a pattern in my Etsy shop, http://www.etsy.com/shop/CraftyisCool.  Happy hooking!

15 Comments »