craftyiscool

Amigurumi Patterns and Playthings

Magic Screen for Pee-wee’s Playhouse

Magic Screen Amigurumi from Pee-wee’s Playhouse

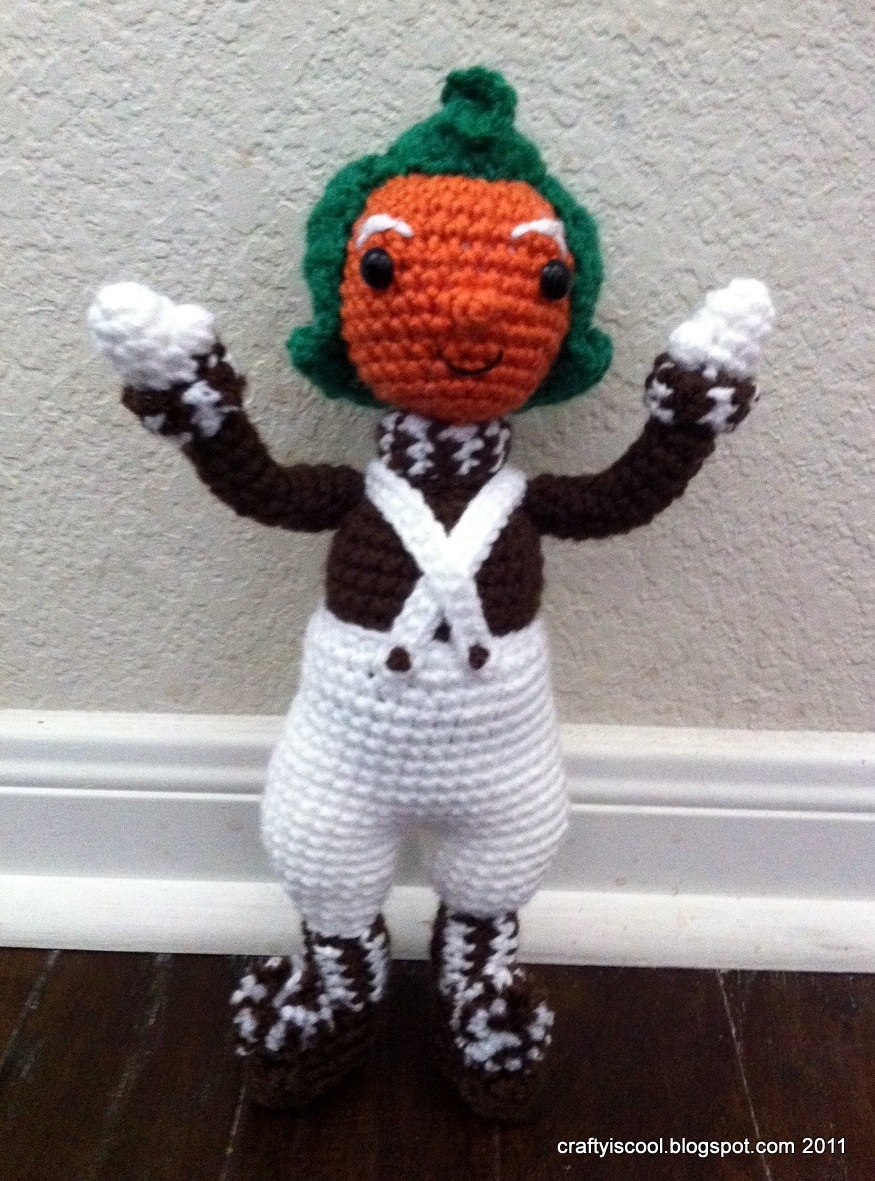
Last year when I made Pee-wee and Chairry, and eventually Jambi, I drew a sketch in my notebook of a Magic Screen amigurumi. It didn’t seem doable at the time. I didn’t know how I would do the legs and everything I thought of seemed really cheesy looking (and the entire screen could not be held up by pipe cleaners!) so I kind of abandoned the idea. (I love that story!)
More digging around at the craft store revealed several non-conventional items that I could use to make Magic Screen, so the project was a go. I made her last night and I couldn’t be happier!

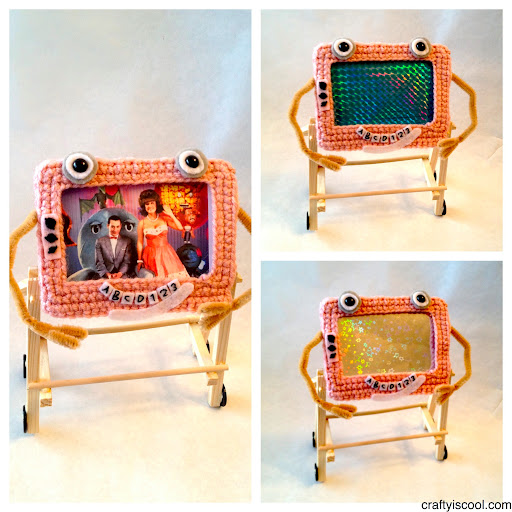
Magic Screen with interchangeable screen

More photos after the jump!

My original big idea was to have her act as sort of a picture frame, where I could change out what was on her “screen”. I wanted to be able to put pictures, patterned holographic paper, or little messages inside. It worked out brilliantly! Little Magic Screen could even play “connect the dots” if I could find a clear enough image for her! (And there is an awesome picture of Pee-wee and Magic Screen’s cousin Magic Johnson that I’m going to have to print out…)

When you try out the pattern (which is now in my Ravelry and Craftsy shops) you’ll probably like how there is not too much to crochet. It goes really fast! The rest of it is getting creative with craft supplies, so what’s not to love?
This Magic Screen is on its way to Pee-wee himself! Au revoir Magic Screen!

11 Comments »

>From Loompaland…

>

Happy Friday! There’s a new pattern in my shop! He’s small and orange with green hair. He likes the color brown, both for fashion and chocolate. He can do gymnastics, squeeze juice from giant blueberry children, shine up some golden eggs, and shrink massive chocolate bars by sending them through the air in a million tiny pieces to your television (where they’re all put together again in the right order). If you’re like me, you grew up watching the Gene Wilder “Willy Wonka and the Chocolate Factory” over and over (and over and over). Its one of my top 5 movies of all time, for sure, and never gets old! 

If you want to make your own little factory helper, its a pretty simple pattern! Thanks for being crafty and cool!
5 Comments »

>Catching up from Fall-ing Behind

>Dang! What’s my problem?!  Has it really been since the end of August that I blogged?  Why am I so bad at this?!  Well, in my own defense (which is odd because probably no one besides me is on the offense) Fall is usually the busiest time of year for most people, especially crafty-types, wouldn’t you agree?  There’s the whole back to school thing, Halloween costume planning and making, gifts for Christmas, stuff just for you, and if you’re selling your stuff, orders.  I am not complaining.  I never relax anyway, so this is just normal stuff for me.  So when all those other things are bogging down my schedule, I guess blogging is on the back burner.

So here’s to change!  I have been up to some good crafty stuff lately, and I wanted to share!  I was so excited to get custom orders for some awesome stuff.  Sometimes I run out of ideas and time so when people ask for specific things that they dreamed up, its so fun!  Recently I made this awesome Chuckles from Toy Story 3.  I’m not bragging about how awesome my Chuckles is, but if you have seen the movie you know what an awesome character Chuckles is.  Really underplayed, and absolutely zero representation in the huge retail push this summer.  So when a fellow Austinite asked me to make one for her boyfriend, I was thrilled!  Here he is!  I’ll probably write up a pattern one of these days.  You know I always keep really detailed notes but it may look like chicken scratch to most people. 

But that’s not all!  I also made a custom Wonder Woman, and the pattern is available!  I really loved her.  Her new owners love her too, I hear.  Her hair has black sport yarn and black sparkly yarn.  She’s a superhero.

Beyond amigurumi designs, I took a few hours the other morning to liven up some dead-boring gray flats.  Linda Perman’s amazing book Crochet Adorned has really innovative and not at all old-fashioned looking crochet ideas.  She has a stitch dictionary in the back with some beautiful flower designs.  I took her shoe embellishment idea and added some flowers.  What do you think?  I absolutely LOVE them and so do a few people that stopped me to ask about them when I was wearing them last night.

I have really super exciting edge of the seat news to share in November!  OK well, exciting to me, in a starstruck-celebrity-sighting kind of way.  But it does have to do with crochet and you will hear about it here first!  I love my job.

One more thing!  I’m going to be starting up some kind of newsletter/special announcement/sales alert/etc thing and there’s a sign up right over there ——–>  Thanks, all!

4 Comments »

>Tiny Jack Amigurumi Pattern

>

Today was the Handmade Nation premiere in Austin! I loved being a part of it, if just a little tiny part, by doing a demo! I brought lots of kits, patterns, tools, business cards, and instructional booklets on how to crochet, and at the end of my “shift”—all GONE! So no one misses out on any of the patterns I had available for the first part of the demo, I’ll be posting them here every few days. First is a little pumpkin with a scary face! Tiny Jack! 😉

Materials:
Orange worsted weight yarn
Green worsted weight yarn
Black safety eyes (6mm)
(E-I) Hook (larger hook will make Jack bigger)
Yarn needle
Polyester stuffing
Black felt
Craft glue

Key:
ch: chain
sc: single crochet
st: stitch
sc2tog: single crochet 2 st together (decrease)

Tiny Jack:
Starting at top of pumpkin and with orange yarn, make an adjustable ring, ch 1, and sc 6 into the ring. Pull closed.
R1: Work 2sc into each st (12)
R2: (2sc into next st, sc into next st)* repeat to end of round (18)
R3: (2sc into next st, sc into next 2 st)* repeat to end of round (24)
R4: sc into each stitch (24)
R5: sc2tog all the way around (12)
Mark your place with a stitch marker and insert the safety eyes into the pumpkin. The back will fit very snugly onto the eye inside the pumpkin. Push hard!
R6: sc2tog all the way around (6)
Fasten off by slip stitching into the next stitch. Leave a long tail and using a yarn needle, weave this tail through the last round of stitches. Pull it tight and the hole will close.
With the tail still on the yarn needle, thread it up through the pumpkin to the top and out, then back in close by, through to the bottom. Knot this tail at the bottom and hide the end inside the pumpkin by threading it back inside.
Using green yarn, create the stem by threading it through the top and back out, tying a knot, threading it back through and keeping a loop on the outside, then tying the tails. Snip off yarn to desired length.
Glue a tiny black felt triangle on for the nose, and a black felt smile on using craft glue.

**He’d be cute hanging on a black cord for a Halloween necklace, from a keychain, or just sittin’ somewhere being spooky!

Leave a comment »